


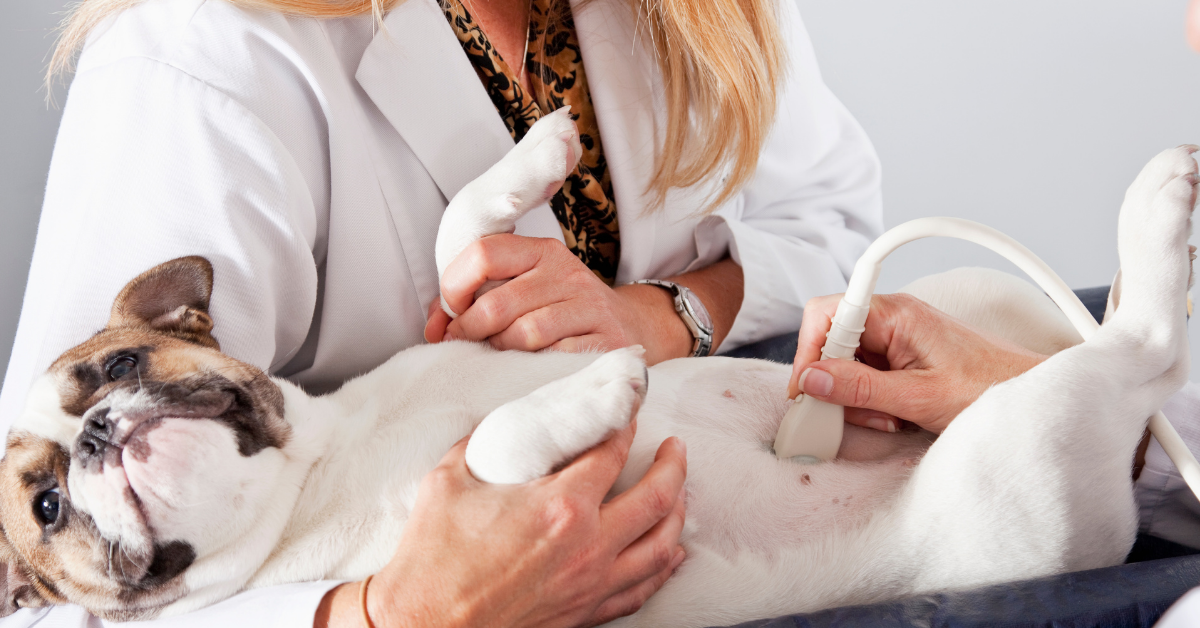
Can Veterinary Technicians Perform Ultrasounds?

With the growing demand for veterinary services—and many vet hospitals being fully booked—many vets are delegating tasks to skilled veterinary technicians when possible. But is an ultrasound something that can be delegated to vet techs?
Here, we’ll cover what separates the duties of a veterinarian and a veterinary technician, and how that applies to performing ultrasounds on companion animals.
Which Duties Can a Vet Tech Legally Perform?
Credentialing, as well as the laws and rules governing what veterinary technicians can or cannot do, vary widely from state to state. So, it’s important to check your state’s rules and regulations for specifics.
However, as a general overview, trained technicians are allowed to perform many of the same duties that veterinarians perform. But they must operate under the supervision of a licensed veterinarian.
There are a few things that vet techs aren’t legally able to do, though. This includes making a diagnosis, prescribing treatments and diagnostic tests, performing surgery, and giving a prognosis.
How Do a Vet Tech’s Training and Legal Restrictions Apply to Performing an Ultrasound?
With the above rules in mind, think about what’s involved in an ultrasound study.
The person performing the study must be familiar with the ultrasound machine and how to use the controls to operate it. They must know how to find the organs/anatomic structures of interest and take the correct views (images and videos) of those structures, along with any relevant measurements.
So far, all of these tasks are something a vet tech could learn how to do.
Although it can take time to learn and practice ultrasound technique, vet techs are smart and educated, and capable of doing many of the challenging tasks a veterinary hospital requires on a daily basis.
So, given the right training and opportunities to hone their skills, it stands to reason that many vet techs could be taught to perform ultrasound studies.
What About Interpreting the Images?
The tricky part comes in when it’s time to interpret the images or videos that were captured during an ultrasound study.
Even though a highly trained and experienced vet tech will probably understand the significance of what they are seeing on an ultrasound study, there are legal limitations to what a vet tech can do with that information.
Interpreting the images would involve making a diagnosis (or at least a diagnostic rule out list) and possibly giving a prognosis. Plus, based on that information, prescribing treatments or additional diagnostic tests (such as performing an FNA or obtaining a biopsy) could be the next step.
Those things would fall into the realm of services limited to a licensed veterinarian.
So, a vet tech could perform the ultrasound study and capture images. But it would be up to a veterinarian to interpret the study.
In many ways, this is very similar to how x-ray studies are already performed in veterinary medicine. It’s also similar to the way ultrasound techs operate in human medicine.
So, it’s not a stretch to imagine a similar system could work for ultrasound studies in vet med.
Potential Pitfalls to Consider
With ultrasound studies, there is value in someone being able to interpret the studies in real-time.
For example, if a mass is noted in the liver, a veterinarian might recommend an FNA of the mass. However, a vet tech wouldn’t necessarily be able to prescribe this next step.
Also, certain findings may require veterinary knowledge to put into context and alter the course of the scan. One example is finding a splenic mass, which might prompt a veterinarian to also look and see if a right atrial mass is present.
One solution is to have veterinarians present (or at least be accessible for questions) during the study. That way, additional views, and procedures could be performed as needed.
However, even veterinarians who are new to ultrasound themselves may run into shortcomings with image interpretation. So, there may be limitations no matter who is performing the study, until a person gains years of practice.
A good place to start is to have whoever is performing the study—whether it’s a vet or a vet tech—use a standardized list of views to obtain. Then those views can be sent to a specialist for interpretation, which will help everyone learn.
Training and hands-on practice are also crucial. Skills will need to improve over time.
Does It Make Sense for Veterinary Technicians to Perform Ultrasounds?
With veterinary practices being so busy since the pandemic, it makes sense to utilize staff (veterinarians, techs, CSRs, and the rest of the team) to their full potential.
This is one reason why the discussion of a mid-level practitioner (veterinary nurse practitioner) role has become more prominent.
Giving additional roles and responsibilities to educated, trained vet techs could carry a lot of benefits. One would be to take some of the time-consuming duties off the doctors.
This could improve the overall efficiency and profitability of the practice by freeing up more time for the vets and allowing them to see more patients or perform more medical procedures.
Additionally, new roles and skills for vet techs could provide much-needed pay increases, job satisfaction, and career advancement opportunities.
While performing ultrasound studies isn’t a full solution to these industry-wide concerns, it’s one example of a skill set that could contribute to the expanding role of technicians in the profession.

Each vet practice must decide what will work best in their individual practice and adhere to the laws of their state. But there are many reasons to believe that vet techs learning to perform ultrasounds could be beneficial to the whole practice.
Written by: Dr. Tammy Powell, DVM

5 Tips to Improve Proficiency With Ultrasound
By becoming proficient at ultrasound studies, a veterinarian can elevate patient care at their practice while also boosting profits.
Whether you’re evaluating the abdomen, the heart, or something else, an ultrasound study can be a very valuable tool.
Here are five ways for a practitioner to improve their ultrasound skills and offer more of this valuable service to pet owners…
The Right Equipment Can Make a Vet’s Job Easier
Having good, well-functioning equipment can really make life easier for a veterinarian and their team.
This could include a variety of factors, such as…
Does all of the ultrasound equipment—probe, machine and monitor, and any programs for saving videos and information—work? Does any component (or the whole system) need to be repaired or replaced?
Is the equipment of a good quality? Maybe it’s technically working, but do the images you produce have enough detail and clarity to see what you need to see? Is any part of the process cumbersome, which can make it less likely that the ultrasound will be used to its full capacity and potential?
Would routine maintenance or an upgrade improve efficiency and make it easier to offer this service to clients and their pets?
This is all-important because even as you learn, practice, and improve your skills, inefficient or subpar equipment may make it challenging to fully implement your new training and may lead to frustration.
Standard Protocols and Techniques Can Improve Efficiency
If an ultrasound is only performed once in a while, it may feel like a hassle or lead to confusion or inefficiency when trying to schedule and perform an ultrasound study.
To improve efficiency and make it easier to offer ultrasound services at your practice, consider all stages of the process, including…
Has the veterinary team been trained and empowered in all aspects of scheduling an ultrasound study? For example, is there a specific day of the week, especially if there is only one doctor at the practice who performs ultrasounds? Has enough time been scheduled, especially if sedation is needed? Having a standard set of instructions or protocols can help the team and make things run smoother for everyone.
If the patient needs any special instructions to prepare for their ultrasound study (such as fasting from the previous evening), is there a clear process for communicating this to the client?
Does the veterinary team know all the tools you would prefer to have available during an ultrasound study? This may include everything from a v-trough, towel, and clippers, to syringes and microscope slides in case an FNA is indicated. Having a kit or list prepared ahead of time will help save time so no one has to run to the other room and grab supplies mid-study.
If a patient is sedated or under anesthesia, is there a standard format/form for monitoring?
Is there a report prepared for the client? Can video clips or still images be saved as part of the medical record? Will the client be present during the ultrasound in some cases? Make sure the whole team knows what should be done.
Take Advantage of All the Resources You Find Helpful
This may include textbooks and other references for what is normal on each ultrasound study and what is not.
Access to a second opinion can also be helpful. Consider discussing your findings with colleagues within the practice, subscribing to an online forum such as the Veterinary Information Network (VIN), or even using a specialist consultation service for an expert, second set of eyes on your ultrasound images or videos.
Practice Makes Perfect
Any new skill can be challenging at the beginning. But ultrasound proficiency will improve over time, with practice. So even if fitting more ultrasounds into a busy schedule feels time-consuming at first, it will probably get to be second nature over time.
In addition to training and courses, it may help to ultrasound healthy patients for practice, to gain a thorough understanding of all the different ways normal anatomy can look in different sizes and breeds of veterinary patients. This could be done with the pets of veterinary team members, or possibly offered to clients at a discounted price in the early stages.
Communicate Effectively With Clients
If pet owners are unsure about proceeding with ultrasound for any reason or experiencing sticker shock, the conversation can take up a lot of time for veterinarians and their team members. By planning what to say and gaining comfort with these conversations, time can be saved while providing patients with the care they need.
Efficient conversations about pet ultrasounds may include general principles for good communication (active listening, empathy, non-verbal communication, etc.), as well as explaining the excellent value that clients are receiving for the cost. For example, explain just how much information can be gathered from an abdominal ultrasound study. In addition to looking at suspected abnormalities, it’s a thorough look at many important organs. Occasionally, unexpected issues are caught early, or if the dog or cat is normal then the owner can have peace of mind.
Putting all these principles together, a veterinary team may find the whole ultrasound process becomes more efficient. This is good for team morale, as it helps to keep the day running as smoothly as possible. It can also increase a practice’s bottom line while providing excellent care for patients.

For all these reasons, it may be well worth it for a veterinary team to invest time and effort in adding ultrasound to their practice!
Written by: Dr. Tammy Powell, DVM

Ultrasound of the Duodenum and Jejunum in Dogs and Cats

There are many reasons why a veterinarian may perform an ultrasound of the duodenum and jejunum sections of the small intestines in a dog or a cat.
For example, the vet may suspect a GI foreign body, inflammatory disease, or neoplasia.
Here are a few key checkpoints to remember when scanning the duodenum and jejunum.
Setting Up the Gastrointestinal Ultrasound Study
If a patient can be fasted, that’s ideal.
An empty gastrointestinal tract may be easier to visualize, whereas food or digestive content may cause artifacts such as beam attenuation. However, this won’t be possible for all patients, especially in an emergency situation.
Patients are often placed in dorsal recumbency, although lateral recumbency may also be used. The patient can also be repositioned mid-study if needed for better visualization.
Performing a Thorough Evaluation
Often, a GI ultrasound study is part of an entire abdominal study. In some cases, the GI tract may be visualized on its own. Either way, to ensure nothing is missed, it’s important to perform the study the same way each time. Many experts recommend keeping it simple by following the GI tract in its normal order of digestion, i.e. starting with the stomach, then moving on to the small intestines (duodenum, jejunum, ileum), cecum, and colon. Examine each segment in both longitudinal and transverse views.
Evaluation should include wall thickness (and whether that thickness remains uniform within each GI section), wall layers, luminal contents, signs of obstruction, the presence of a GI mass or multiple masses, infiltrative disease, and whether there’s normal motility/peristalsis.
The Duodenum
The duodenum is located along the right lateral abdominal wall in dogs. It can be found near (ventral to or ventrolateral to) the right kidney. The cranial portion may be challenging to see and may require viewing via an intercostal approach.
In cats, the duodenum may be closer to midline, or just right of midline.
The wall of the duodenum is up to 5mm thick in dogs, and 2-2.5mm thick in cats.
Jejunum
It’s often difficult to trace the long jejunum loop by loop. So, most veterinarians evaluate the jejunum by sweeping the transducer from side to side across the abdomen, in a cranial to caudal direction. Slightly overlapping each sweep will ensure that nothing is missed.
The wall of the jejunum is 2-5mm in dogs, and 2-2.5mm in cats.
Evaluating the Layers of the Intestinal Walls
The walls of the intestinal tract have 5 specific layers, in this order: the luminal-mucosal interface (most interior layer), mucosa, submucosa, muscularis, and serosa (outermost layer).
In longitudinal view, these layers are easily distinguished from one another (in a normal patient), thanks to their alternating pattern of hyper- and hypoechogenicity. The inner and outermost layers, and the submucosa, are hyperechoic. The mucosa and muscularis are hypoechoic.
If these 5 layers are not distinctly visible throughout the intestines, it could indicate a problem. For example, focal wall thickening with obliteration of the layers could indicate focal neoplasia.
Make notes of any wall thickenings, whether they’re focal or diffuse, and whether the 5 layers are still distinguishable or not.
One normal finding that could be mistaken for abnormal is Peyer’s patches (pseudoulcers) in dogs, which appear as focal, hyperechoic indentations within the hypoechoic mucosal layer.
Signs of Obstruction
Sometimes, the obstructing foreign body may be visualized directly. However, this is often not possible. So, a foreign body obstruction may be detected due to differences in intestinal dilation proximal and distal to the point of obstruction. The intestinal tract proximal to the obstruction would tend to be dilated with fluid and gas, while the distal intestinal tract is normal or even empty.
With a linear foreign body, plication of the intestines may be seen via ultrasound. The foreign body itself may or may not be well visualized.
In case of an intussusception, the affected section of intestines will have a characteristic “bullseye” appearance in transverse view. If this is noted in an older pet, be sure to search for signs of neoplasia that could explain why the intussusception occurred.
Intestines may be hypermotile with a recent obstruction, but possibly hypomotile with a more chronic condition.
GI Neoplasia and Inflammatory Conditions
Neoplasia in the digestive tract may occur as a solitary mass, multiple masses, or diffusely as an infiltrative disease.
As mentioned above, discreet masses are often identified because of their focal thickness relative to the rest of the intestines and disruption of the wall layers.
Infiltrative disease, however, can be more difficult to pinpoint. There may be wall thickening with or without disruption of the wall layers. In particular, it can be challenging or impossible to differentiate between small cell lymphoma and inflammatory bowel disease in cats without further testing.
Regional lymph nodes should be evaluated, too.
Conclusion

The duodenum and jejunum are an important part of any GI evaluation. It’s helpful to get an idea of what’s normal and what’s not for these sections of the small intestines, as they’re commonly evaluated for a variety of conditions, including those listed above.
Written by: Dr. Tammy Powell, DVM

Patient Injury & Complications In Veterinary Dentistry

The nature of anesthesia brings risk in general. In veterinary medicine, during dental procedures, pets are often placed in vulnerable positions which can lead to increased risk of injury and medical complications.
These risks can be minimized or entirely avoided with careful consideration, and proper training and continuing education of staff. Listed are a few of the more common injuries that can occur during a dental procedure.
Aspiration Pneumonia
Aspiration pneumonia in pet patients occurs when the patient inhales a foreign substance and develops lung inflammation and infection as a result.
The most common occurrence during dentistry is water and debris entering an unprotected airway, hence allowing fluid and debris to enter the lungs. This can occur from an underinflated tracheal tube, or repositioning during the procedure that allows fluid to enter the airway.
Aspiration pneumonia can also occur if the patient vomits or regurgitates during anesthetic recovery.. To reduce the incidence of dental-related aspiration pneumonia, maintaining the patient on their back during the procedure, and avoiding repositioning has proven to not only lessen the risk of aspiration but also lessens the amount of anesthesia needed during the procedure.
In addition, antiemetic medications given during the premedication phase can help reduce the incidence of post-anesthetic nausea and vomiting. Caution should be taken during the recovery phase to wait until the patient is alert and responsive enough to deflate the cuff and remove the tracheal tube.
Tracheal rupture
Tracheal rupture in dogs and cats are more frequent during dental procedures than any other medical procedure. Seventy-five percent of tracheal ruptures are thought to be associated with oral surgical procedures with the incidence more common in cats than dogs.
Tracheal injury can cause symptoms such as mild dyspnea, and even death. The most likely cause of tracheal rupture is thought to be due to an overinflated tracheal cuff, as well as failing to detach the tracheal tube from the anesthesia hose during repositioning, which can cause a torque on the inflated cuff resulting in a tear of the dorsal membrane of the trachea.
Another common cause of tracheal rupture is a patient that is not adequately anesthetized and coughs or lunges upward during intubation, tearing the trachea.
Pressure from an overinflated cuff can cause pressure necrosis of the trachea, showing delayed symptoms of inflammation and scarring.
Avoiding over-inflation of the cuff, using new tracheal tubes, testing the cuff to ensure proper inflation prior to use, avoiding repositioning as much as possible, and ensuring a level plane of anesthesia prior to intubation can help minimize the risk of tracheal rupture.
Artery Damage during Tooth Extractions

Arterial damage to arteries such as the palatine artery which runs the length of the mandible can accidentally occur during routine tooth extractions where the instrument can slip from the practitioner’s hand.
These injuries can be mild to more severe requiring surgical intervention.
The most effective way to avoid this type of injury is to implement extraction techniques involving gingival flaps where the roots are exposed, and more easily undermined, and extracted.
Written by: Dr. Tammy Powell, DVM

Ultrasound-Guided Cystocentesis: How and Why to Do One

There are several ways to collect a urine sample from your patient, including free catching, using a urinary catheter, and doing a cystocentesis.
A cystocentesis—which involves obtaining a urine sample via a needle placed directly into the bladder—may be the preferred method in many cases.
This is especially true when you need a sterile urine sample, such as for culture and sensitivity testing for UTIs. And in general, a cystocentesis will provide more accurate results than a free catch urine sample, since it reduces contamination from cells or pathogens of the skin.
It’s possible to perform a cystocentesis by palpating the bladder or using anatomical landmarks alone. However, an ultrasound can make the process easier by removing the guesswork and allowing you to visualize everything.
Here’s how it works…
How to perform an ultrasound-guided cystocentesis for dogs and cats
Prepare for the procedure.
Use an appropriate size syringe (usually 3ml to 12ml) based on the size of your patient.
Choose a needle size and length based on your patient size. A 22g needle works well for many patients.
Use a towel, trough, or other cushioning to make your patient more comfortable during the procedure. This may help minimize their movement.
Use appropriate patient restraint.
For some dogs and cats, this could mean having a trained team member hold them. For very anxious or fractious patients, this might mean chemical restraint.
Dorsal recumbency is generally the best way to position your patient.
Be sure to clean the area of skin where you’ll be performing the cystocentesis. If needed, consider clipping the fur, too.
Estimate the bladder location.
You’ll use your ultrasound to see the bladder, but anatomical landmarks will give you a good starting point for where to place the probe. Try one of these methods…
Locate the caudal four mammary nipples and mentally draw an ‘X’ between them. The bladder will often be near the cross point of the ‘X’.
Place a small amount of alcohol on the caudal abdomen so it pools. Often, the bladder is located directly under where the alcohol naturally pools on the midline.
Visualize the bladder.
Place your probe onto the caudal abdomen. You should be able to see the urinary bladder on the screen—it’s a fluid-filled structure that has the appearance of a ‘black balloon’ with gray or white walls.
Check for any abnormalities.
You could focus on just doing the cystocentesis. However, while you’re visualizing the bladder, it may help to do a cursory exam (or even a more in-depth evaluation, if indicated) to look for any problems contributing to the patient’s urinary symptoms.
For example, note if you see any thickenings, masses, calculi, or other issues in the urinary bladder.
Obtain the urine sample.
Place the needle directly through the abdominal wall, just in front of the ultrasound probe.
Aim the needle slightly caudally.
You should see the needle on your ultrasound screen. Use this visual to guide you, to be sure you get a good, clean sample rather than aspirating part of the bladder wall.
Prepare your sample for analysis.
Right after the cysto, replace the needle on the syringe with a sterile one.
Then, divide and prepare the sample in a timely manner (the fresher the sample, the better for testing) for any tests you need to perform, whether that’s in-house or at an outside lab.
In many veterinary hospitals, cystocentesis is safely performed several times per day, and complications are very rare. However, as with all medical procedures, some risks exist.
These may include…
Hematuria (usually mild and transient).
Much rarer complications such as bladder injury, leakage of urine into the abdomen, puncture of internal organs or blood vessels, or vagal reactions (retching, panting, hypersalivation, collapse).
Seeding of tumors.
If you suspect your patient has a bladder tumor such as transitional cell carcinoma, it may be best to avoid a cystocentesis. Otherwise, the needle could ‘seed’ the tumor as you withdraw your sample from the bladder, allowing cancer to spread into the abdominal cavity.
An ultrasound may help you to notice abnormalities such as bladder tumors during the procedure, in which case your recommendation to the client may change.

Fortunately for most pets, a cystocentesis is a quick outpatient procedure that provides a lot of valuable information. And many dogs and cats don’t show any side effects at all.
For patients with urinary symptoms, a cystocentesis is often the way to go for the most accurate diagnostic testing results and to get to the bottom of the issue faster for healthy pets and happy clients.
Written by: Dr. Tammy Powell, DVM

5 Tips for Radiation Safety During Uncertain Times
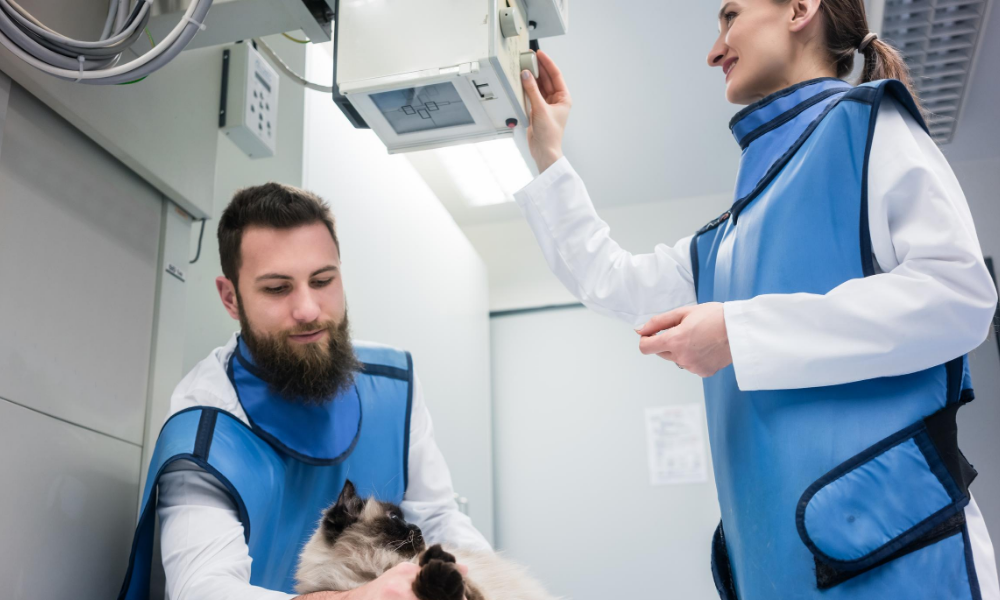
Your x-ray unit is something you use frequently—probably every day, or multiple times per day—in your practice.
You know radiation safety is important. But recently, if you’ve had to reduce the number of team members in the building at any given time, maybe it feels like there aren’t enough hands on deck for patient restraint and positioning.
The good news is, some of the same principles that reduce radiation exposure can also help your team operate more efficiently.
Here are some tips to maintain safety, even when you’re shorthanded…
A.L.A.R.A.: A Brief Reminder
A.L.A.R.A. stands for “As Low As Reasonably Achievable,” and it’s the guiding set of principles that help you reduce radiation exposure to yourself, your staff, and your patients.
This is important because ionizing radiation from x-rays can damage cells, and cumulative exposure can lead to health risks such as cancer and genetic damage to reproductive cells.
To minimize exposure, there are 3 principles to keep in mind:
Time
Distance
Shielding
Decreasing exposure times, increasing the distance between your team and the x-ray source, and using PPE, all can help to decrease radiation exposure.
Tips for Radiography Safety and Efficiency
Hands-Free Restraint
Increasing the distance between your team members and the x-ray source is one of the most effective ways to decrease x-ray exposure.
Think of the inverse square law, which states that doubling your distance away from the x-ray source results in ¼ of the dose of x-ray radiation.
That’s a significant decrease!
Also, scatter radiation comes from the patient—so by not touching the patient, you’re reducing your exposure.
This can be accomplished by using:
Chemical restraint.
Positioning aids such as sandbags and tape.
A combination of both.
In addition to contributing to safety, hands-free restraint also increases staffing efficiency.
Especially for large or wiggly patients, it takes fewer staff members to position the patient when hands-free restraint is used.
Patient Comfort
A patient who wiggles at the last moment can lead to a crooked radiographic image—and thus, the need to retake that view.
The more shots you take, the higher the x-ray exposure to your team members.
Keeping a dog or cat’s comfort in mind can help you get the shot you need the first time—and decrease the need for retakes.
Here’s how you can do this…
Minimize fear and pain (for example, pain from stretching a sore leg to get the right position) by using chemical restraint.
Use a trough or other aid for comfort. Lying with their back on a cold, hard table can cause even the most cooperative of pets to squirm. Giving them a cozy place to settle into can really help.
Play white noise or background music. This helps make the big buzzing and beeping sounds from the x-ray machine less startling to a dog or cat.
In addition to a better patient experience and less x-ray exposure, these methods help save your staff time by getting your views more quickly.
Getting Things Right the First Time
The fewer images you take, the less radiation exposure there will be.
In addition to the measures listed above, here are some ideas for taking the fewest views possible…
Good planning. Be sure to know exactly which views you need ahead of time and what position the patient needs to be in for those views. Communicate these expectations clearly with your staff.
Proper measurement. Measure the patient in the position they will be in during the shot (lying down rather than standing).
Have a technique chart, or use appropriate settings in your digital unit. Teach team members how to make quick and accurate adjustments in settings, too.
Use collimation. In addition to producing a higher-quality image, collimation decreases scatter radiation.
A thorough understanding of x-ray positioning and machine settings will save your staff time and headaches—in addition to minimizing radiation exposure.
Who Should Be in the X-Ray Suite?
Only the team members taking the radiographs should be near the machine. Clients shouldn’t be in the x-ray suite, and other team members should be fulfilling other duties—especially when you’re shorthanded.
Rotating the staff you have on x-ray duty can also help minimize their cumulative exposures.
So, it’s smart to invest in training multiple team members. That way, you’ll also avoid delays if your “go-to” x-ray staff member ever needs to call out sick or otherwise miss a day.
PPE Care and Use
Even though the nature of your daily practice may have changed, it’s still important to keep up with x-ray safety measures, such as making sure your PPE is in good condition.
Experts recommend checking PPE every six months, and this includes radiographing your aprons, gloves, and thyroid shields to check for cracks. Of course, check and replace sooner if there are any notable defects.

Uncertain times may be stressful, but you and your team can continue to help the patients who need you while keeping yourselves safe.
Written by: Dr. Tammy Powell, DVM